
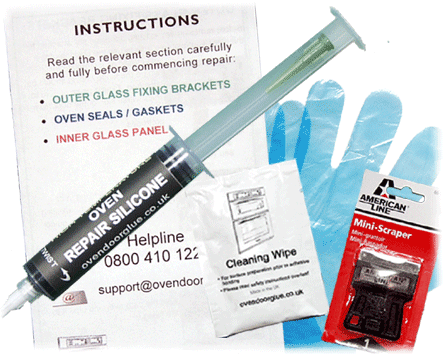
Oven Door Seal Glue
Stick your oven door seal with the Oven Door glue Kit
If your oven door seal is slipping, loose or has come apart the Oven Door Glue Kit can provide a lasting, low-cost repair. It can also be used for the common problem on some Hotpoint, Indesit and Creda ovens where there is a seal between the inner door and inner glass and where the oven door seal keeps coming off – usually after the glass was once removed for cleaning. We have heard from many customers how frustrating this seemingly irreparable problem was – some had reached the point of thinking they would need to buy a new oven! But the oven door glue holds the seal firmly, and the problem is solved. See bottom of page for instructions.
A poorly fitting oven seal will mean that it takes longer for your oven to reach the required temperature, and requires more energy to maintain it at the correct temperature. You are heating the kitchen and not just the oven!
The adhesive can also be used to glue the metal connectors that are often used to join the ends of an oven door seal, where these are pulling out – see below.
Important: Some Gas ovens intentionally have a gap between the ends of the seal to allow air to enter and the gas to burn correctly. It is essential that this gap is maintained on a gas oven where it was integral to the design of the oven. Failure to maintain the gap can lead to a build up of carbon monoxide. Electric ovens are not affected by this as there is no combustion taking place in the oven.
The oven door glue has two essential properties that make it an excellent means of repairing the rubber like door seals:
- The adhesive is unaffected by temperatures up to 300 Centigrade – much higher than a normal domestic oven.
- The adhesive is extremely flexible when it has cured – it forms an elastic rubber like material, providing flexibility as materials expand when heated.

The flexibility of the oven door glue makes it ideal for oven seals
Purchasing a new seal for your oven door can be expensive (often upwards of £30.00) where they are still available. Cheaper “universal oven door seals” will often be the wrong thickness for your oven, and due to the difficulty in getting the right fitting regularly end up being worse than the previously sagging gasket at retaining the oven heat.
The quick and easy solution is to fix your oven seal with the oven door glue kit.
See what our customers have to say about the oven door glue kit, where they have used it to repair oven door seals and gaskets.
How to use the oven door glue to stick an unstuck / hanging rubber seal:
- Ensure the surfaces to be glued are clean and free of grease.
- Prepare some short pieces of masking tape or similar
- Run a bead of adhesive along the intended path of the oven seal, taping at right angles across the seal, every few inches, to hold the seal in place whilst the adhesive cures.
- Allow 8 hours before carefully removing the tape, supporting the seal either side of the tape with your fingers, so as not to tear the seal.
- The seal should now be firmly held in position, but we recommend that a further 16 hours is allowed before using the oven, to ensure that the adhesive has fully cured.
How to use the oven door glue to stick the metal clips into the rubber seal:
- Ensure that the clip and the inside of the seal is clean – use a cotton bud / pipe cleaner to clean in the seal.
- Squeeze some of the adhesive into the seal end, then push the metal clip into the seal
- Allow the adhesive 24 hours to cure before the joint is put under any tension.

Ensure that the oven door seal, and the clip are free from grease

Place the glue into the oven door seal, then push the clip into place

Ensure the oven door seal is not under tension whilst the adhesive cures
Hotpoint Oven door seal keeps falling off the inner glass?
This also affects some Creda and Indesit oven seals too.
Typically, you will have an inner door glass, held in place by two “D” shaped metal brackets, screwed to the inner door, to clamp the glass down. Between the glass and the metal inner door should be a rubber gasket, to ensure a seal. The seal has a slit in it that the metal lip pushes into. However, no sooner do you start using the oven, than the rubber seal slides off the metal lip and the glass leaks hot air. The Oven Door glue kit is the answer to your problem and has been used by many of our customers to stick the seal in place.
To achieve a lasting repair, do the following:
- Ensure the surfaces to be glued are clean and free of grease. After cleaning the metal lip with the wipe in the kit, wrap the wipe over the end of a flat spatula, and run the wipe down inside the split in the seal, to ensure the seal is free of grease.
- Prepare some short pieces of masking tape or similar
- Run a short bead of adhesive inside the split of the seal – just a few cm’s or 2 inches of glue bead. Then push that part of the seal onto the metal lip, tape masking tape at right angles across and around the lip, to hold the seal in position whilst the adhesive cures.
- Work around the seal a small area at a time, placing some more glue inside the split in the seal as before – you do not need a continuous bead, and a gap between the beads of a few inches will not be a problem, but do ensure there is glue around the corners, then push in position and tape again.
- Work your way around the entire seal, and then leave for 24 hours before carefully removing the masking tape. You can then place the glass back in position and you should have no further problems.